Introduction
In this how-to-guide we will be securing Proxmox with Authentik using the OAuth2/OpenID provider in Authentik.
Proxmox Virtual Environment is an open-source server virtualization management solution based on QEMU/KVM and LXC. You can manage virtual machines, containers, highly available clusters, storage, and networks with an integrated, easy-to-use web interface or via CLI. However, it is important to keep your data secure. Authentik Self hosted is an open-source Identity Provider focused on flexibility and versatility . It is an excellent option for those who want to keep their data secure and have greater control over their software.
Head over to my previous blogpost Introduction to Authentik to learn more about what Authentik is.
Configuration
Here are the steps to install and configure Proxmox with Authentik authentication:
- Install Proxmox on your server. You can find the installation instructions here.
- Create an OAuth2/OpenID provider in Authentik with the following settings:
- Name: proxmox
- Redirect URI: https://proxmox.company:8006 (Note the absence of the trailing slash, and the inclusion of the web interface port)
- Signing Key: Select any available key
- Create an application in Authentik that uses this provider. Optionally apply access restrictions to the application. Set the Launch URL to https://promox.company:8006.
- Configure Proxmox to use Authentik as an authentication source. SSH into any Proxmox cluster node, and issue the following command:
pveum realm add authentik --type openid --issuer-url https://authentik.company/application/o/proxmox/ --client-id xxx --client-key xxx --username-claim username --autocreate 1
You can find the Issuer URL on the Provider Metadata tab in Authentik. You can find the Client ID and Key on the Provider Edit dialog in Authentik. - Restart the Proxmox service to apply the changes:
systemctl restart pveproxy.service systemctl restart pvedaemon.service - Verify that the configuration is correct by logging in to Proxmox with your Authentik credentials.
Finishing up
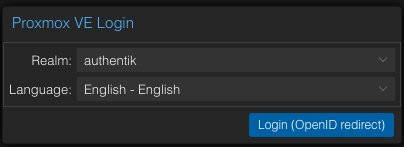
You can now login into Proxmox with an account configured in Authentik by selecting the authentik realm on the login page.
By following these steps, you can install and configure Proxmox with Authentik and have greater control over your software. Authentik will also allow you to customise the login steps to even add DUO multifactor authentication.
Leave a comment!